Onboarding Guide to the Gaia-X Web3 Ecosystem
This document serves as an onboarding guide to participate In the Gaia-X Web3 ecosystem.
1. How to perform participant identification
To create a trustworthy, secure and transparent data infrastructure, we need a clear identification process for participants. A participant is, according to the Gaia-X Trust Framework, a legal person, which is identified, onboarded and has a valid participant credential. Therefore, to ensure trust in the ecosystem, you must create a Gaia-X compliant participant credential for your company first.
The following information is needed to identify a legal person as Gaia-X participant and to create a valid Gaia-X participant credential.
- The legal name of the instition as stated in the documents of incorporation and relevant registers.
- A valid registration number (vatID, EORI, EUID, LEI Code). The details of applicable registration numbers are stated in the Trust Framework Chapter 5.2.1.
- The headquarter address, specifically the ISO 3166-2:2020 country code.
- The legal address, specifically the ISO 3166-2:2020 country code.
- The same details for a parent company if this onboarding is done for a subsidiary.
- Your public address(es), derived from your public key(s), in the Pontus-X network
Example: https://www.delta-dao.com/.well-known/2210_gx_participant.json
The issuer of a participant credential, attesting this information, needs to sign the Gaia-X Terms and Conditions as stated in the Trust Framework Chapter 5.1.
Example: https://www.delta-dao.com/.well-known/2210_gx_tandc.json
The registration number will be part of a dedicated credential in the upcoming version of the Trust Framework.
Example: https://www.delta-dao.com/.well-known/2210_gx_registrationnumber.json
You can either sign and create all these credentials on your own or with the help of an accredited Gaia-X Trust Anchor or Gaia-X Digital Clearing House (GXDCH). For the current ecosystem we do not require production grade X.509 certificates (eIDAS QWAC, EV SSL) and deltaDAO is able to onboard you as a Trust Anchor to Pontus-X.
During onboarding you will provide the required information for your institution through an institutional e-mail address for basic domain validation and deltaDAO will verify the information before onboarding.
deltaDAO will create a first SECP256K1 keypair for you and explain in the course of the document how you can set up a wallet to manage and use your keys in the ecosystem. If you already have a SECP246K1 keypair, you can also submit your public address to be added to the participant credential without compromising your private keys.
With the first Gaia-X compliant participant credential your institution is identified and can now participate in the Pontus-X ecosystem.
2. How do I join?
After we have signed and confirmed your participant credential as a Trust Service Provider of the Pontus-X ecosystem, we can now equip you with a private key and a public address OR you can already use your existing private key and public address to
- allow your institution to consume service offerings in Pontus-X
- publish service offerings and implement use cases in Pontus-X
- allow you to use the federation services of the ecosystem
- identify your institution in the test network as participant of Pontus-X and Gaia-X
You now joined the ecosystem as registered participant. As most interactions with the federation services in this ecosystem require some form of compensation we'll equip you with virtual currency for the test ecosystem and guide you on how to setup your wallet for interaction with the ecosystem.
3. Setting up a wallet
To get started as a participant in the ecosystem you need to take control over your private key(s) and insert it(them) in a wallet. The wallet allows you to perform interactions, such a signing and submitting transactions.
You will either use your private SECP256K1 keys you have created yourself OR use a set of SECP256K1 keys we created for you during guided onboarding (shared keys).
Your private key SECP256K1 will look like this (just an example):
- do not use! 0d9619d1702c7a4ff89ecf3720132812f0d124ca503a61c5f3a60e0451236365 do not use!
Some important notes before you continue:
- This private key controls your identity in the ecosystem, create a secure offline backup.
- Do not share it with anybody outside your organization , don't store it in the cloud.
- If you received the key during guided onboarding and it is shared with us: We also have control over this private key for testing and to assist you during your first steps in the ecosystem so do not use it in any production system under any circumstances.
- If you lose control over your private key please inform us immediately so that the Pontus-X federators can blacklist it for the network.
- You are not allowed to store any personal information on the network , i.e., names, or e-mail addresses when publishing own service offerings on the network.
In this ecosystem we use a Web3 wallet for interactions. Best for starters is MetaMask as browser extension. It allows you to sign transactions and test contracts with other ecosystem participants.
MetaMask is a widely used Web3 browser and mobile wallet solution to store your keys and sign transactions with more than 10 million monthly active users (MAU) that is considered a secure "hot" wallet. There are also other open-source Web3 wallets available, but for this guide we continue with MetaMask.
Step 1: Install MetaMask and setup a personal password for the wallet
You can just follow the instructions here https://metamask.io/download/
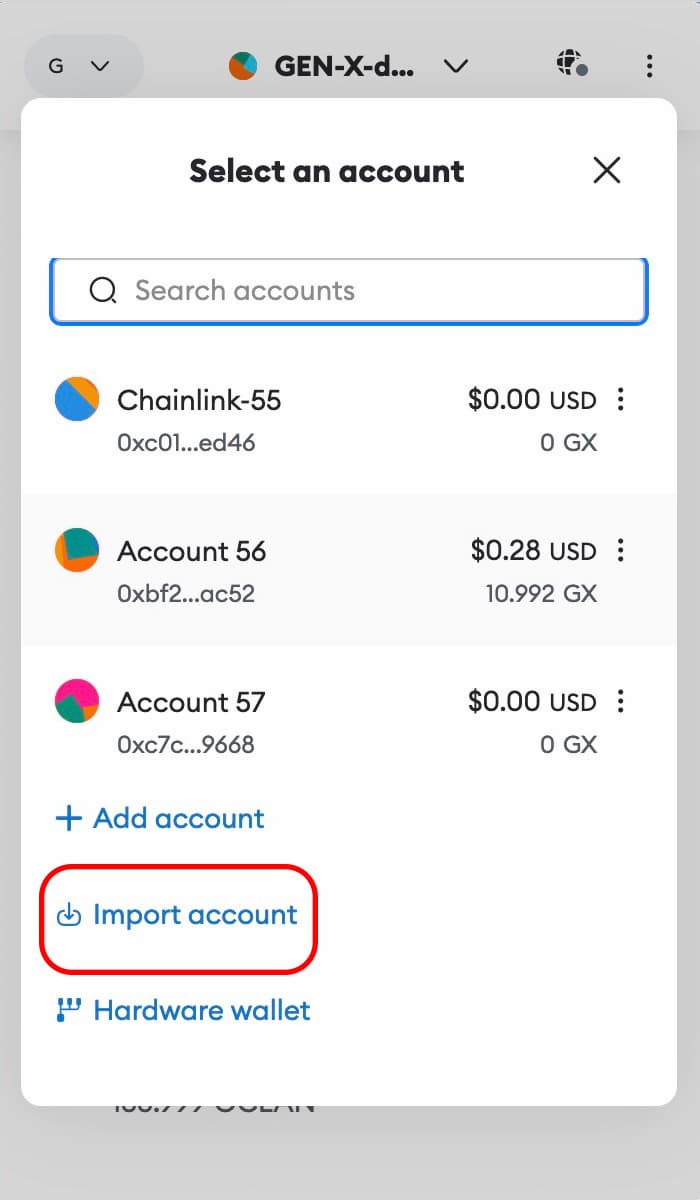
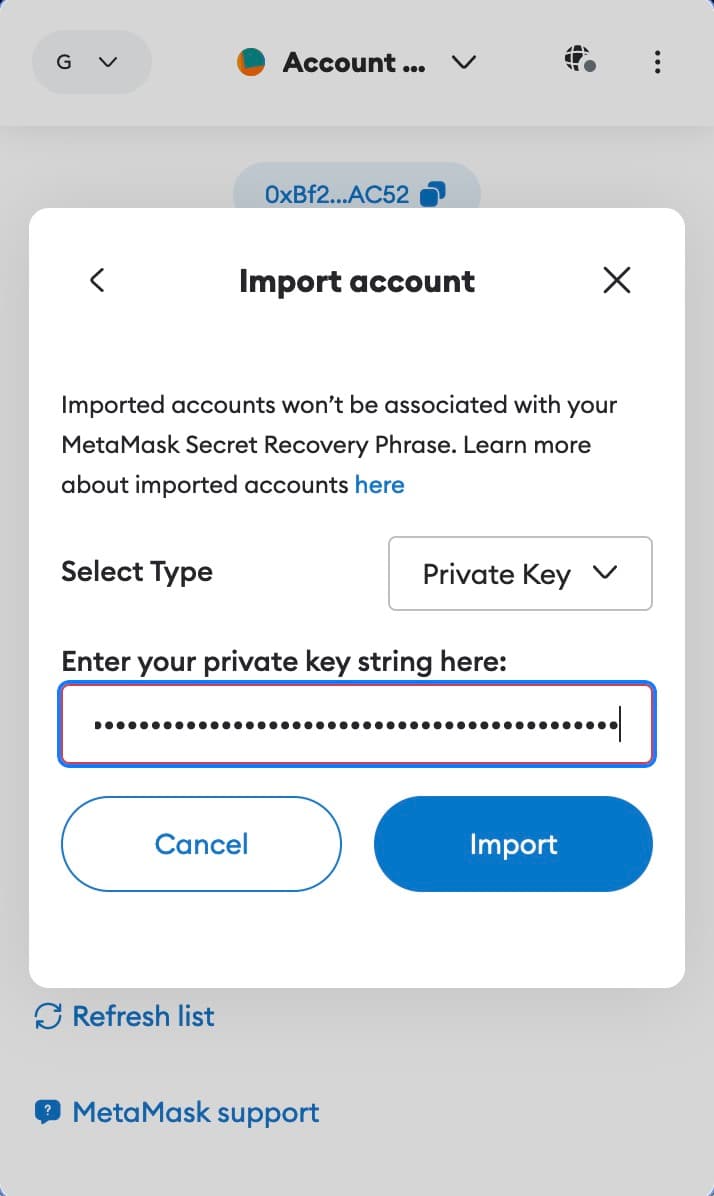
Step 2: Importing Accounts (if you want to import a keypair)
If you have set up your local MetaMask in your browser (Chromium-based or Firefox) and secured it with a password, you can import the private key we shared with you through the "import account" feature.
Once you have imported the account, you can select it through the icon in the upper right corner. You can give the account a custom name instead of "Account 2" by opening the menu indicated with the three dots and opening "Account details"
You can give the account a custom name instead of "Account 2" by opening the menu indicated with the three dots and opening "Account details"
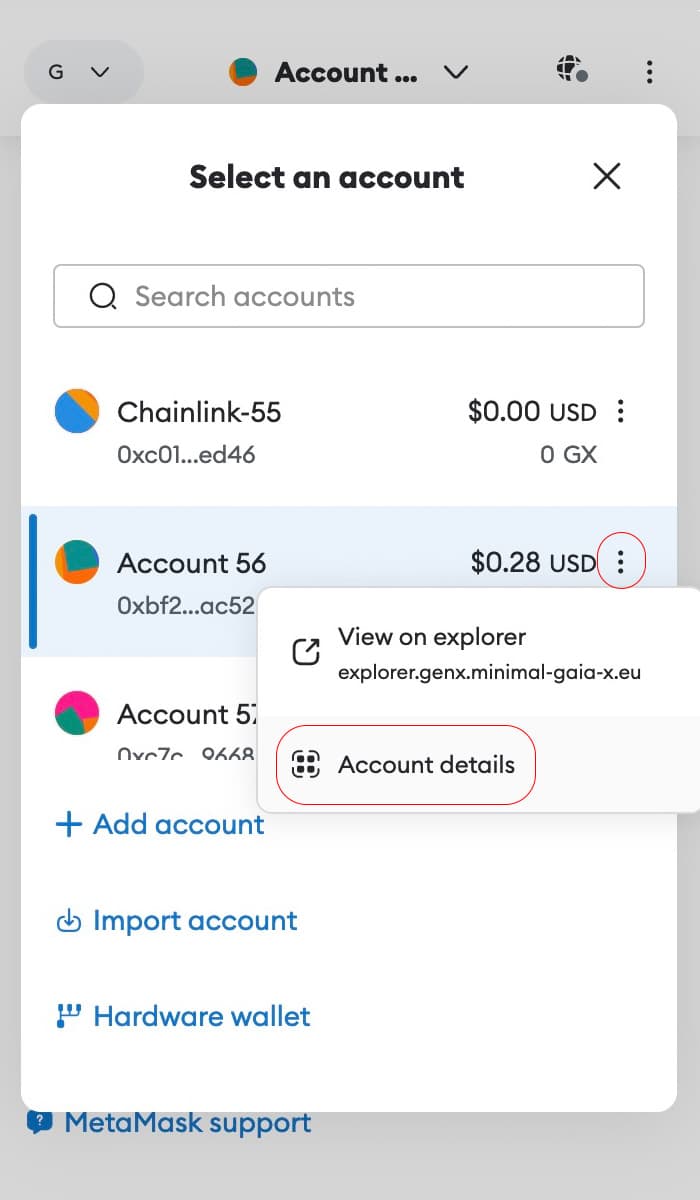
When you click the pen icon you can add a custom name for this account.
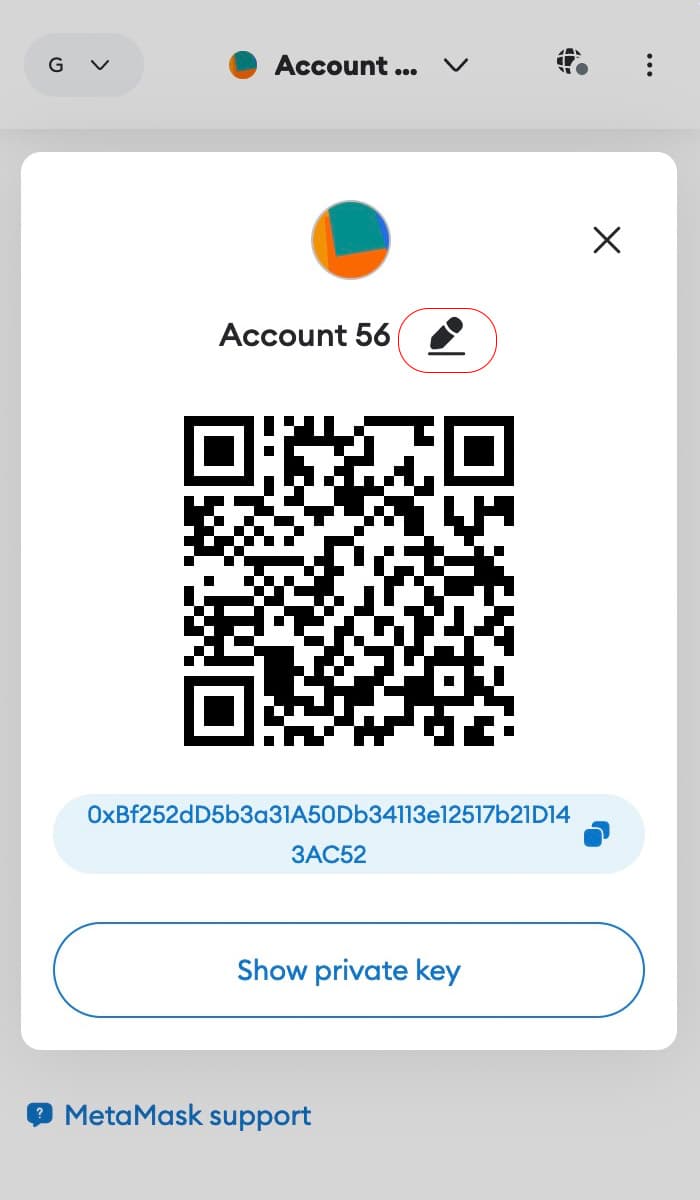
You will be able to confirm your selected account by checking the public address of this account matching the public address in your participant credential. Simply press the middle field displaying the address and it will be copied to your clipboard.
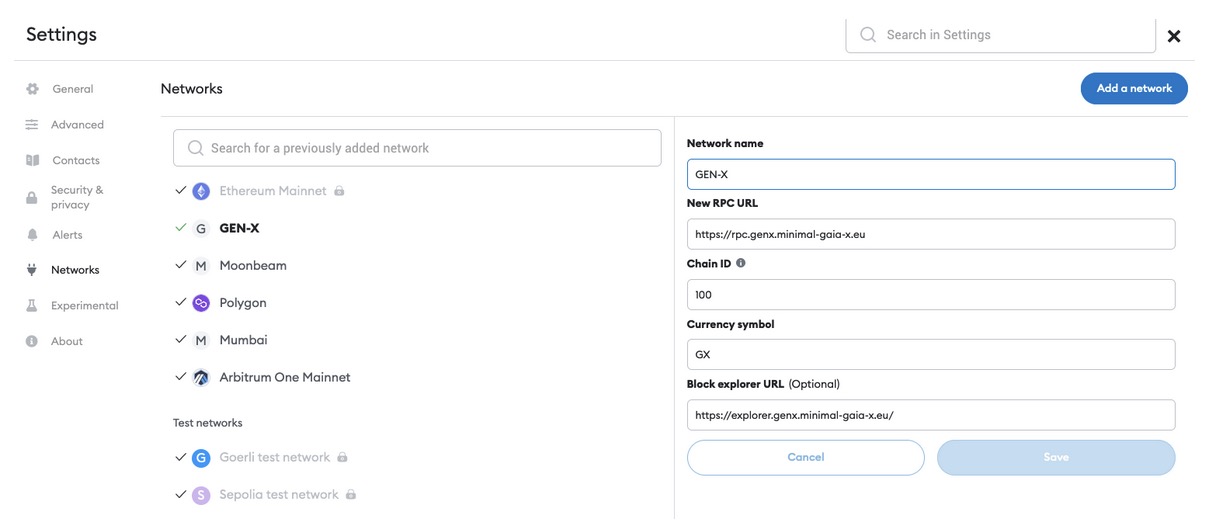
Step 3: Connecting to the right network
Furthermore, you need to select the right network "Pontus-X testnet" by selecting it from the network field at the top of the wallet. You can add the Pontus-X test network manually under "settings" and "networks". For this route you need to following network configuration:
- Network name: Pontus-X TESTnet
- New RPC URL: https://rpc.test.pontus-x.eu
- Chain ID: 32457
- Currency Symbol: EUROe
- Block Explorer URL: https://explorer.dev.pontus-x.eu/pontusx/test
Once you have added the network, selected the right network and address, and connected to the portal you can refresh the website and you will appear as logged in. When connecting for the very first time MetaMask will ask for permission to connect to a Portal which you should accept. You can use the https://v4.minimal-gaia-x.eu/ Portal as example or any other portal.
First indicator of success is the portal showing your public address and GEN-X network selection now.
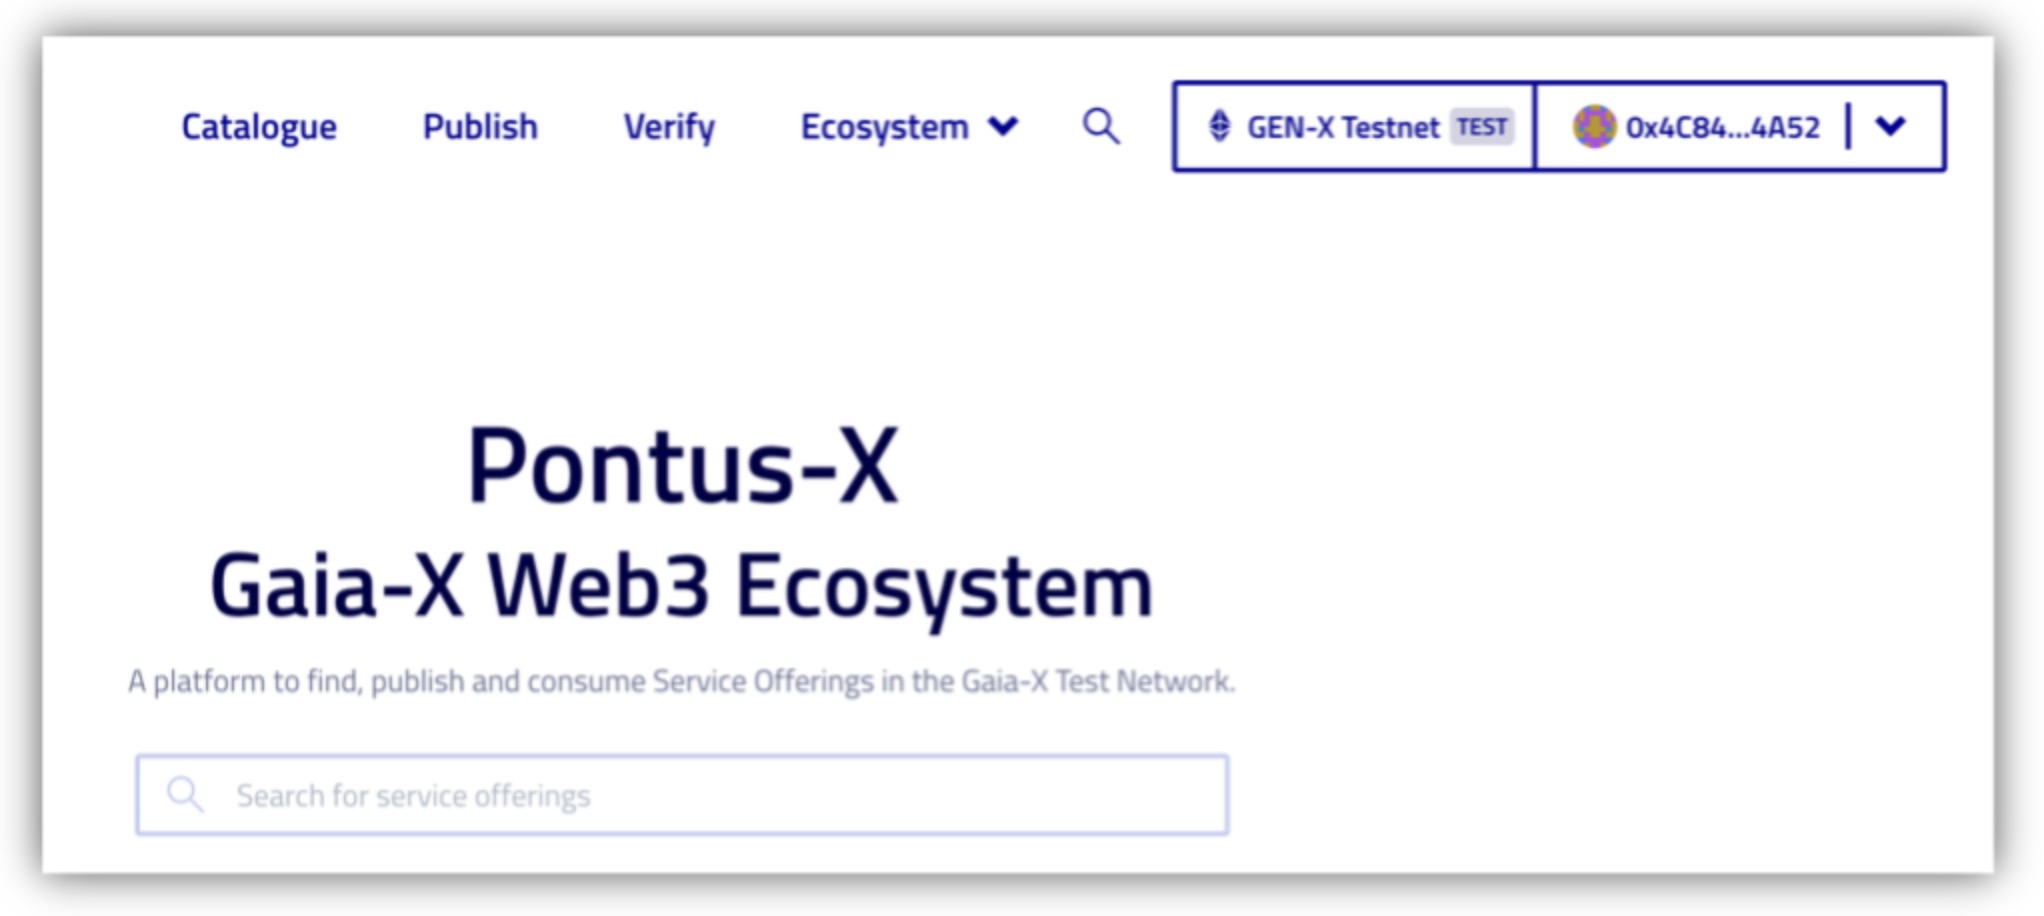
The wallet will also indicate this with a green dot.
Well done, the setup is completed.
Step 4: Funding your wallet
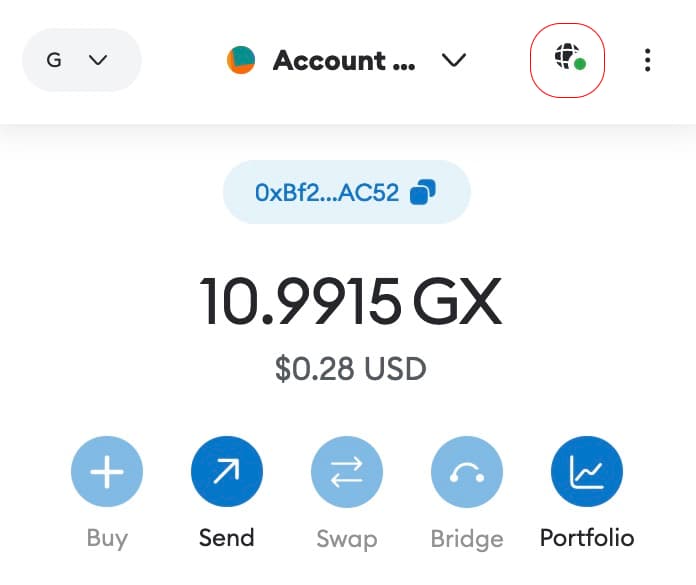
Your public address will be associated with a public balance of ERC20 tokens that are used to pay for transaction fees, settlement in the network and managing access to services.
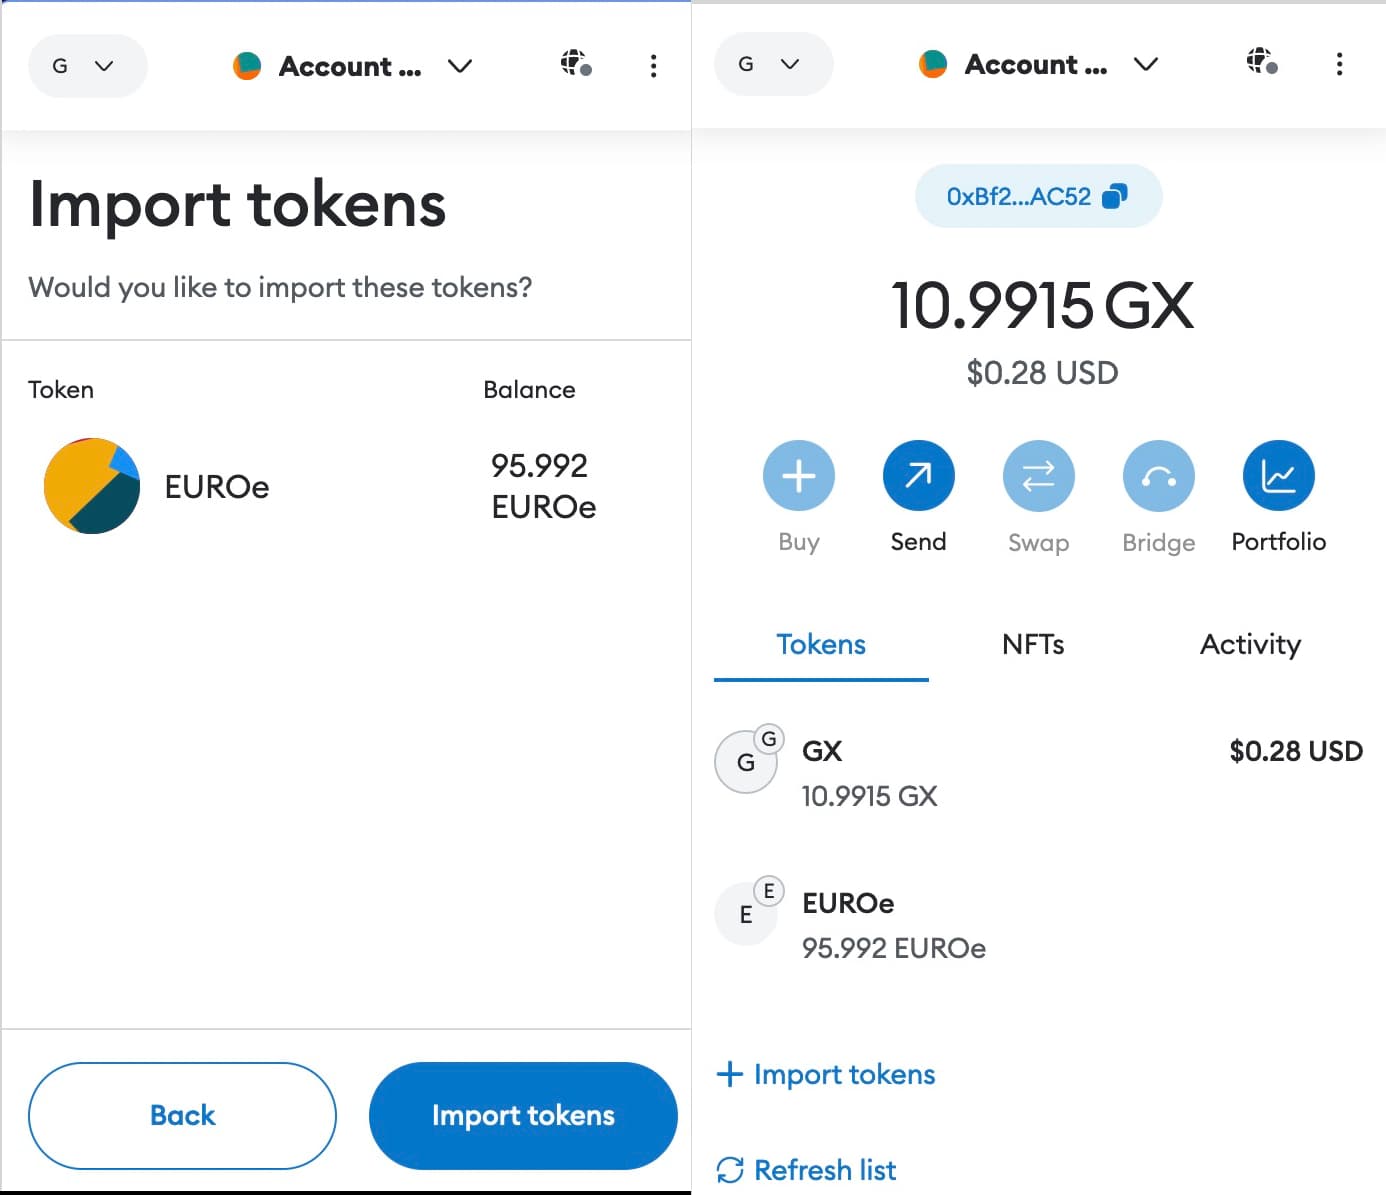
If you have completed the onboarding with us and have been accepted in the ecosystem you will have received an initial balance of ERC20 tokens and the balance will be shown in your MetaMask wallet.
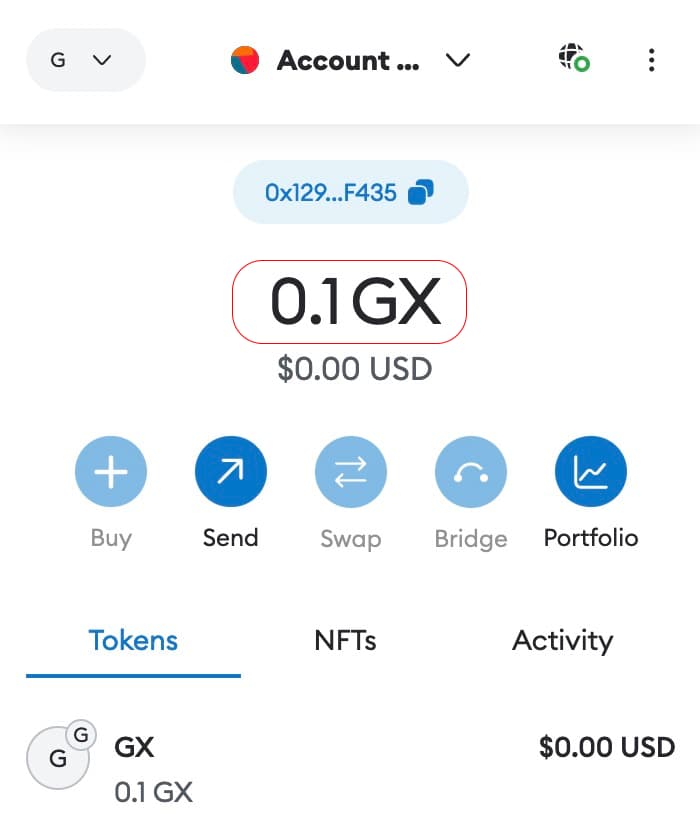
You should now see some GX ERC20 tokens in your wallet. 0.1GX enough for many of transactions in the network. If you don't see a balance here please check your network connection, if you have selected GEN-X as network and if you selected the right public address.
Other ERC20 tokens besides the basic fee token are not visible by default and you will need to add them manually. You can do so through the portal frontend under your profile section.
Just open the top right menu and click "add EUROe" (0xe974c4894996e012399dedbda0be7314a73bbff1) or "add OCEAN" to make the corresponding smart contracts known to MetaMask and to query to balances from the network.
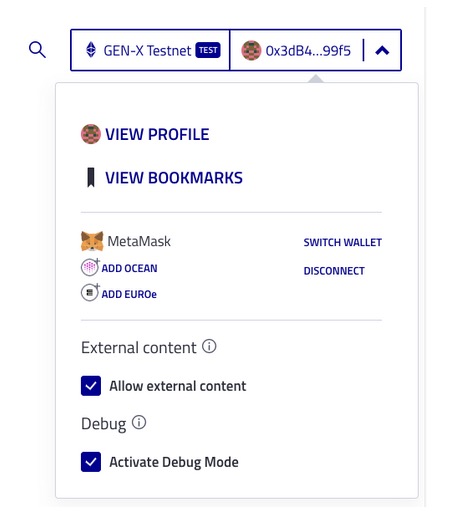
Once you confirm the dialogue the balance will appear in your wallet.
Introducing to the Pontus-X ecosystem
From here on you will be able to interact with the Pontus-X network, sign and approve transaction, cover fees and to publish, manage and consume service offerings associated with the network.
1. How to find services
The easiest way to discover services published in the network is through the various portals, such as https://portal.pontus-x.eu/ or https://euprogigant.pontus-x.eu/
The portal landing page will offer an overview of selected service offerings and the catalogue will show a (filtered) overview of available services (depending on the portal used).
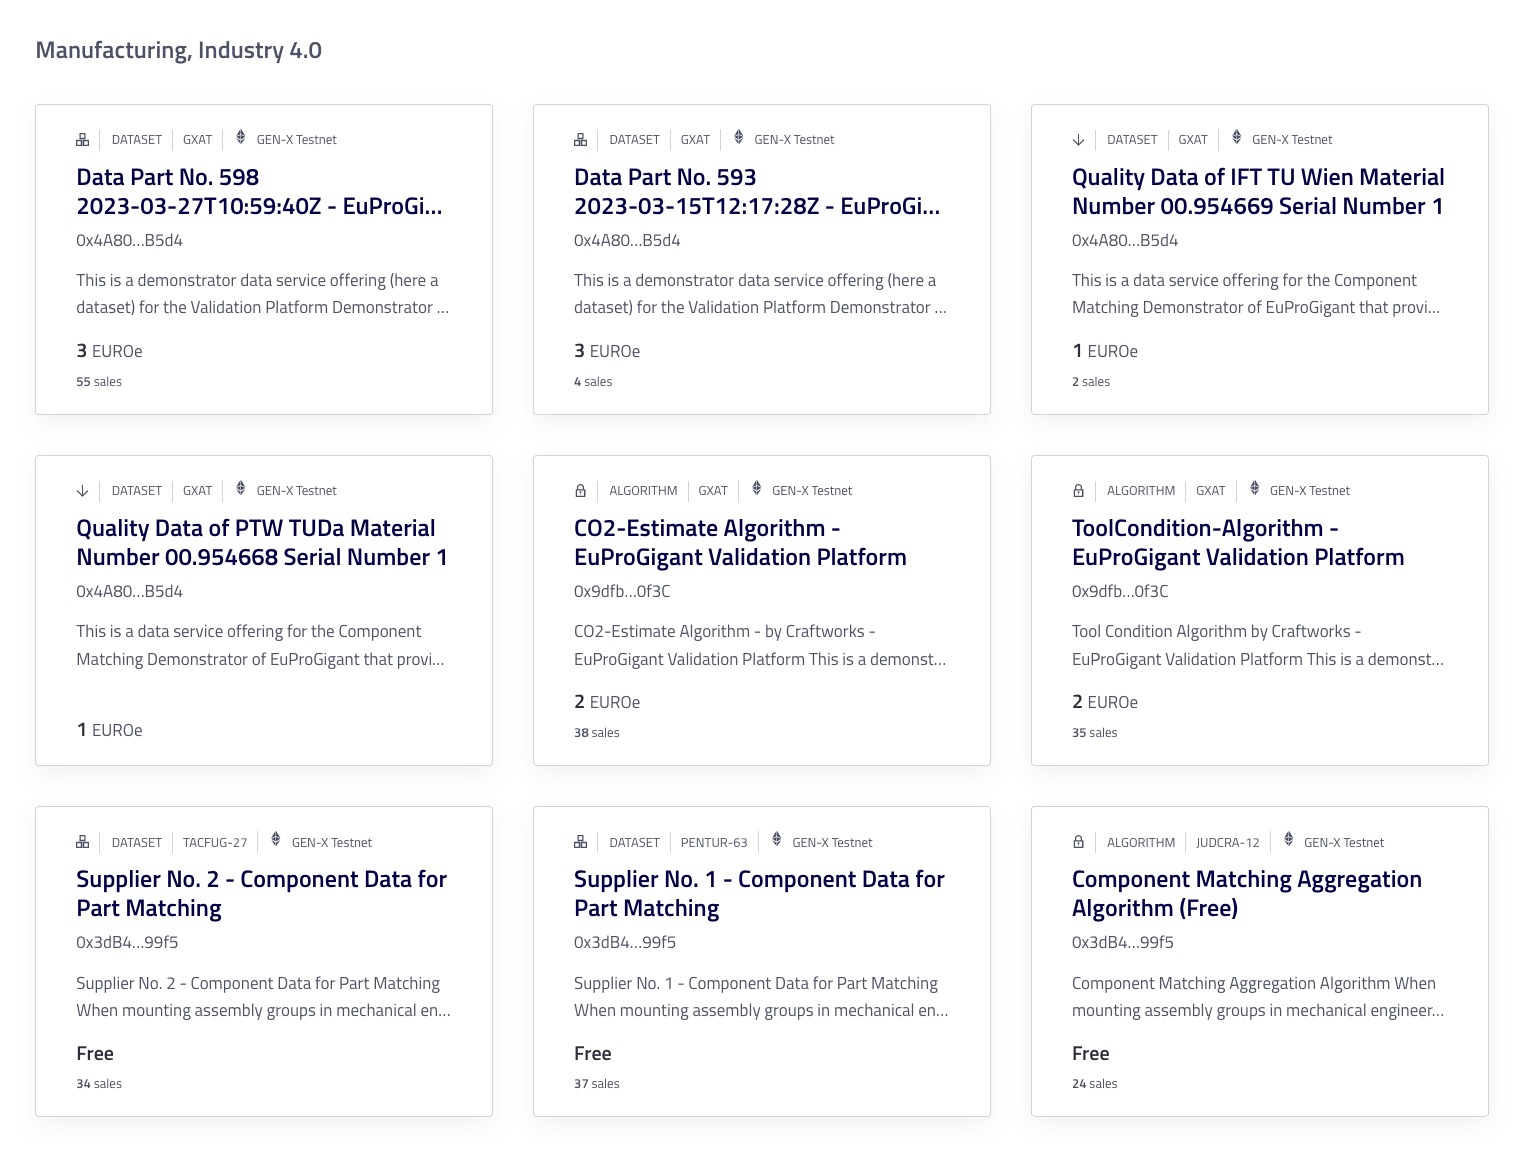
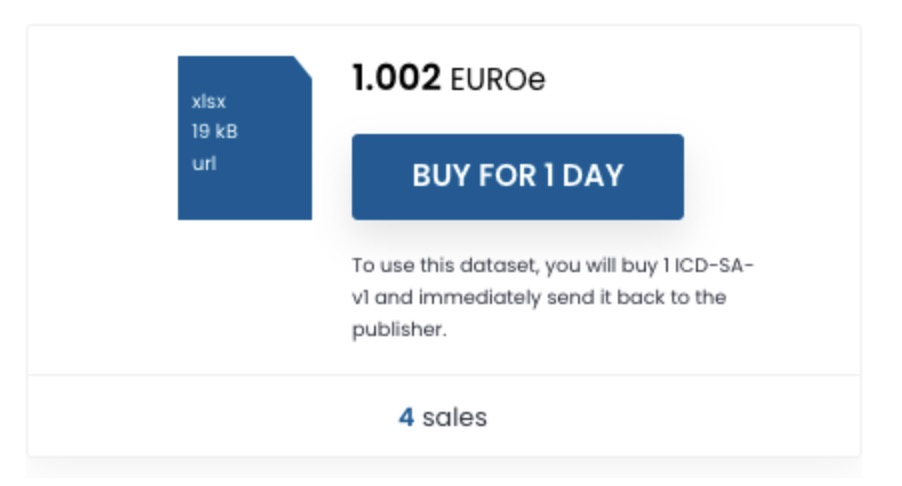
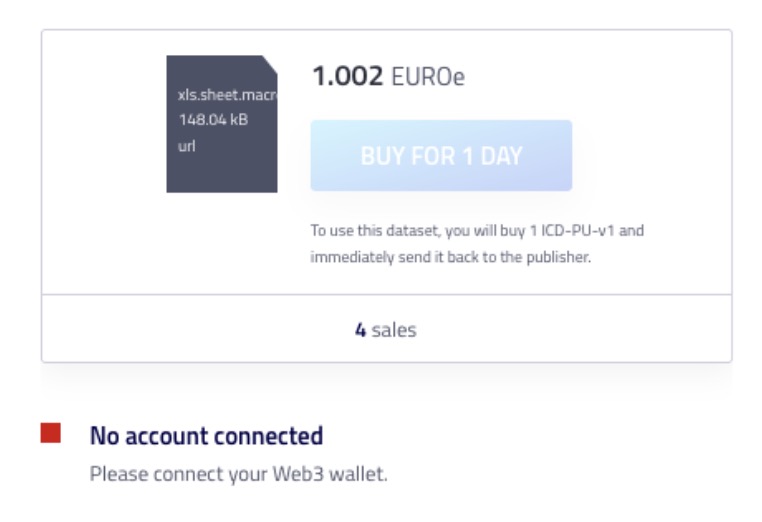
The service metadata summary already informs you about some important aspects of the displayed services, such as name, title, short description, price, number of consumptions/sales, the network where the service and its contracts are residing and if it is a data service for download or actually an application to be used with data.
When we inspect a service in detail more information becomes available.
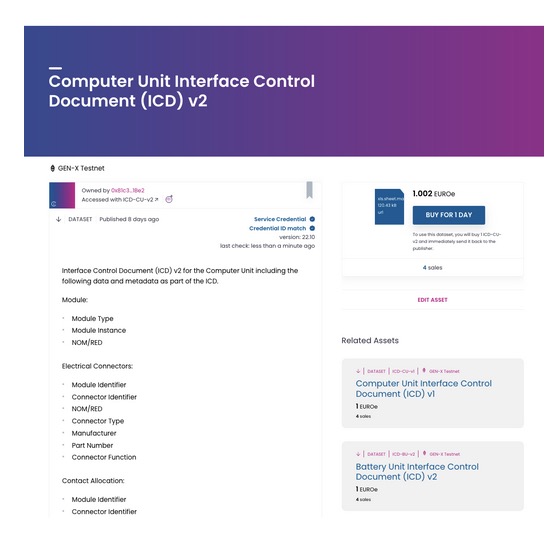
All services are identified by a unique identifier, the DID.
You are informed about the owner of the asset, identified by the public address. This can be manually resolved to a participant using the participant register https://docs.genx.minimal-gaia-x.eu/docs/Community/participants
Below the owner information the access token for this service is displayed.
You can also see if a Gaia-X compliant service credential has been added to the service and if it matches this services DID.
On the righthand side you will find a summary of the costs of consumption for this services, denominated in a currency specified by the service provider, i.e. in EUROe. This currency will be used for pre-paid settlement for a subscription and the settlement must be completed before the service can be accessed during the subscription period.

This initial guide will not cover the full extend of information given here in the service details page for now.
2. How to consume services
To consume a selected service the following requirements must be met.
- you must be eligable to consume the service or combination of services. By default the services can be consumed by any participant unless the service provider did restrict access to certain potential consumers or purposes.
- you must have a sufficient balance associated with your selected public address a) sufficient to cover network fees and b) sufficient to cover costs for the service offering
- you must be connected with the portal and network with the right public address.
If all conditions are met the buy button will indicate this by beeing available and not greyed out.
If not you will receive an indication in the frontend.
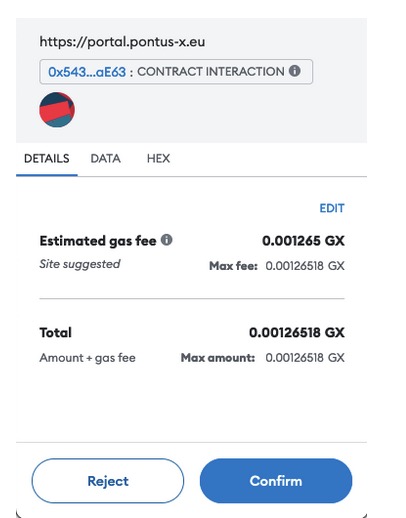
If you want to start consumption you press the "buy" button and will be asked to sign a number of transactions to
- document your consent with the Terms and Conditions of the service(s)
- make your balance available for a transaction
- pay for the service and to acquire an access token
- (exchange the acquired access token for access to the service)
The first transaction will set and approve a maximum spending cap for the following transaction that determines how much you allow to be paid for the service. This is a security feature which is not really useful for a service with a fixed price, but needs to be completed nonetheless. This will NOT increase the price of the service, even if you enter a higher number.
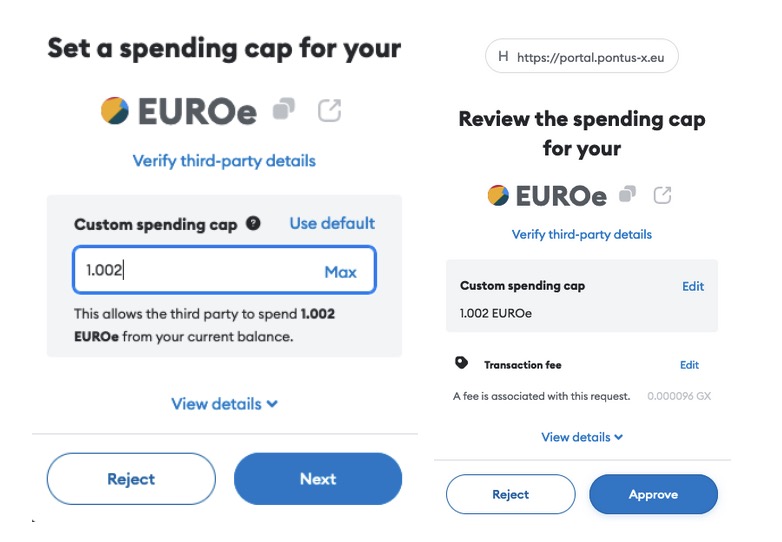
When you approve this transaction it will be submitted to the network and documented which will take a few seconds.
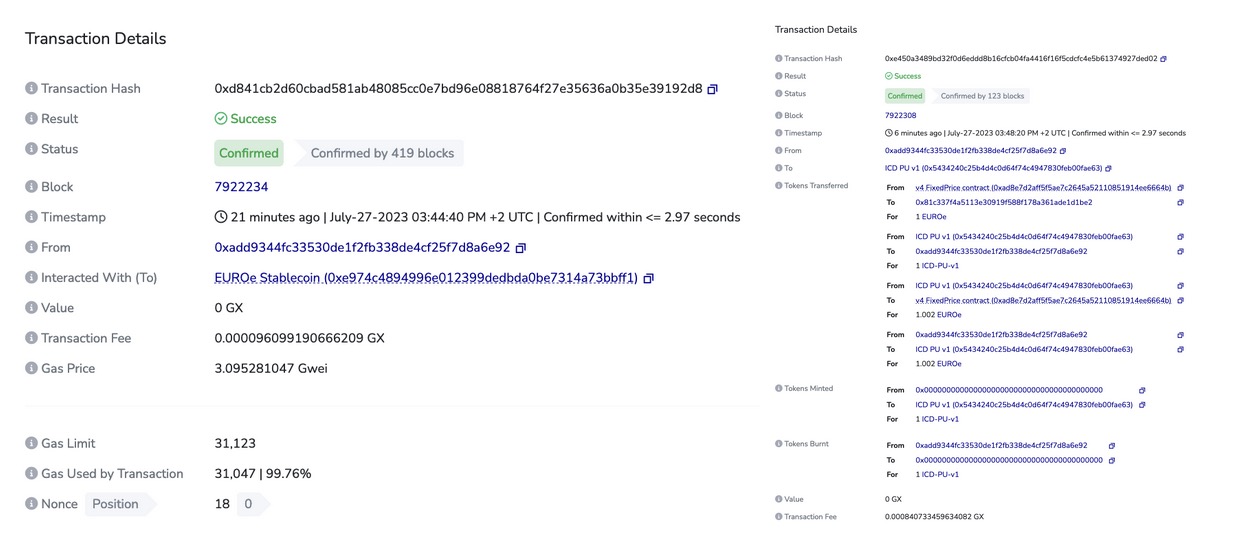
In the next step you will approve the transaction with the service provider to exchange currency against the access token required for the service.
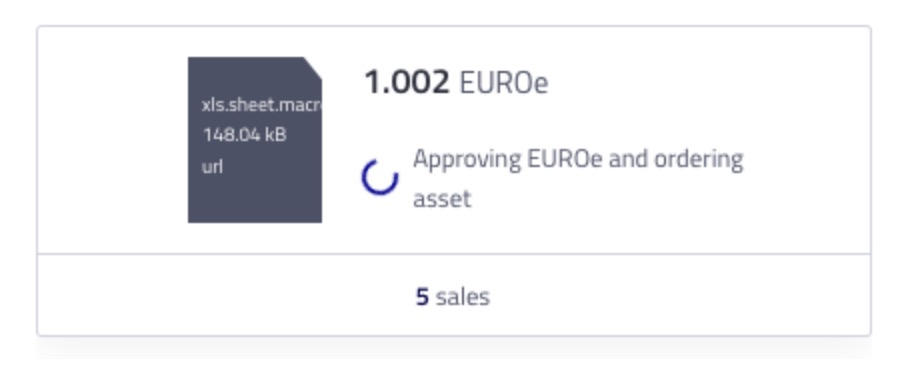
This transaction will induce network fees to cover the cost of federation services and infrastructure provided by federators (network validators). When approved the transaction will be submitted to the network, the exchange will be facilitated and the acquired access token will be exchanged to execute the right to use the service. This creates an audit trail entry and marks the beginning of the service subscription which is documented in the federated logging service.
The access controller used by the service provider will use this audit trail event and proof of transaction to determine if a user has the right to access the service and to check the identity of a user.
You will be able to asses the status of the transaction through the logging service and the wallet.
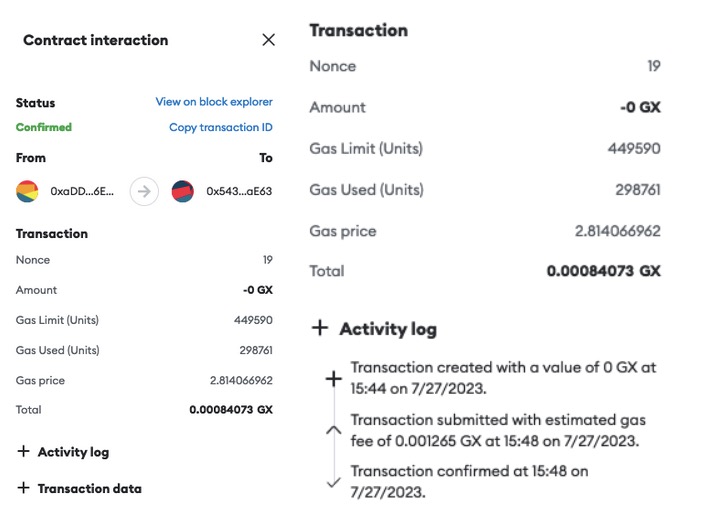
The results of both transactions can also been seen in the Logging Explorer for the used network.
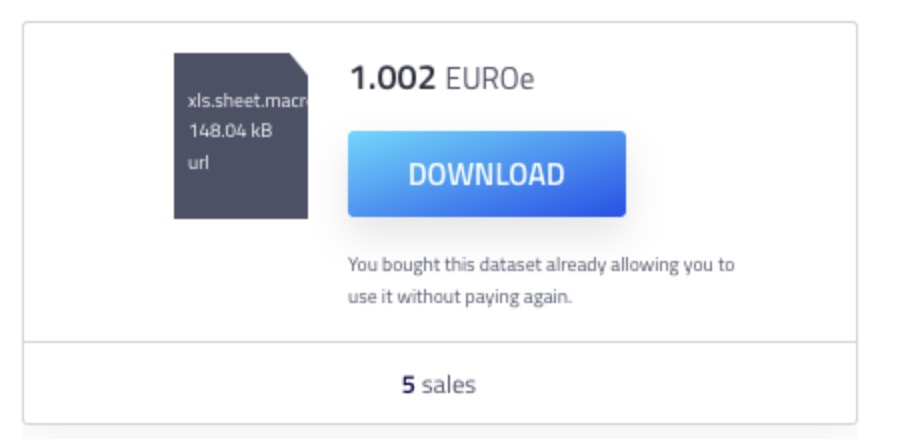
Now the service can be consumed and results can be accessed. Please note that in the case of a Compute-to-Data process there will be a second service offering and contracting process involved and at least 5 transactions are required as two contracts with up to three parties will be stipulated.
3. How to access results
Now the service can be consumed by the consumer which is indicated by a download button.
If a download is requested from the access controller designated by the service provider the identity of the consumer must be confirmed to match the identity of the party who signed the contract with the service provider. For this reason you will need to answer a signature request to prove you have control of the private key associated with the public address of the consumer.
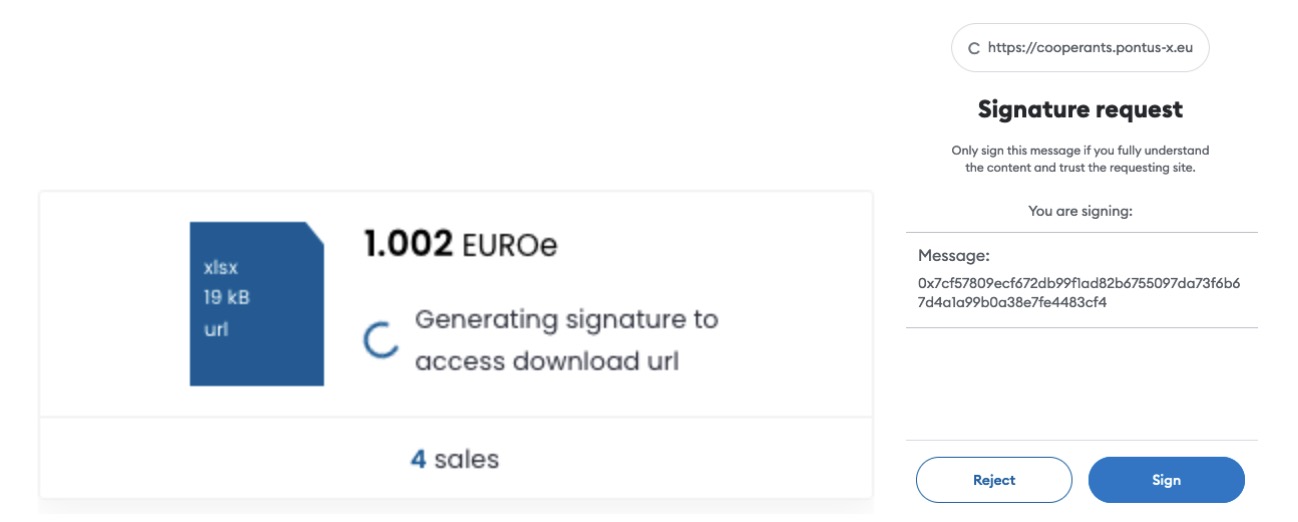
If the signature has been verified successfully by the access controller the HTTPS download will be initiated and the file can be downloaded.
All these processes can be initiated without the graphical user interface of the portal using the Python or JS libraries or Nautilus.
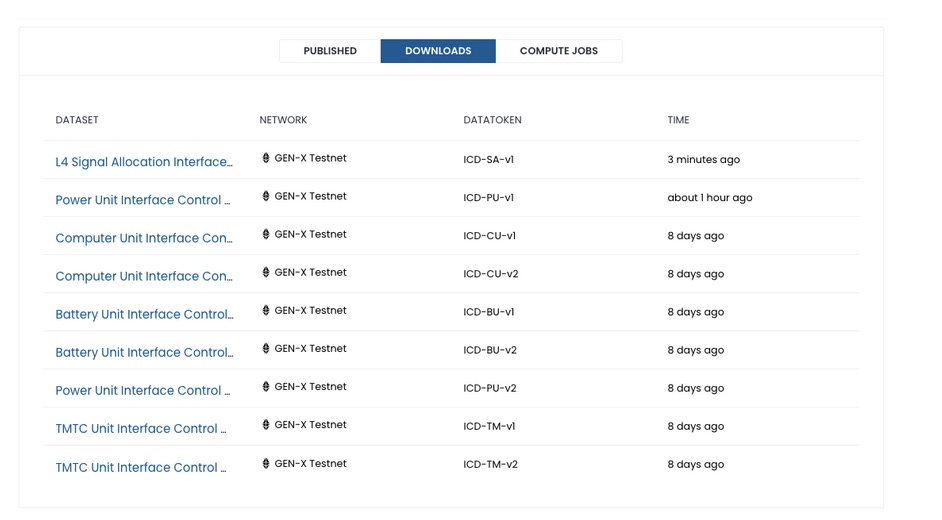
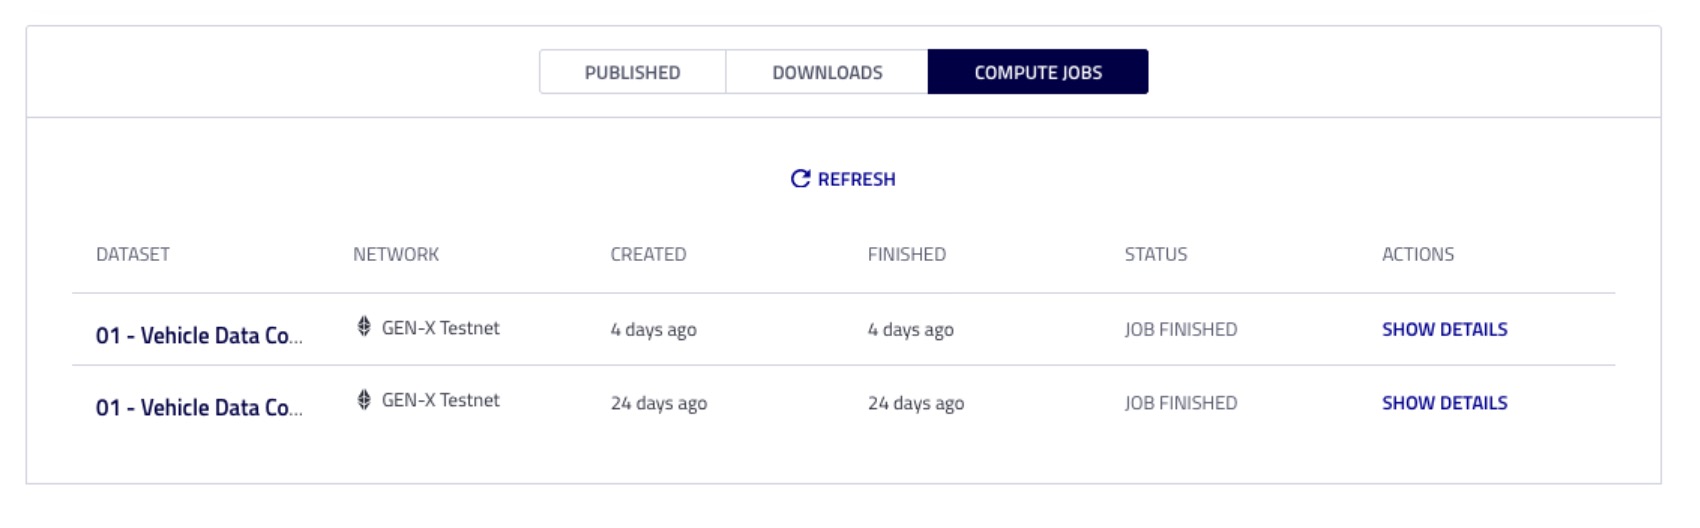
4. How to access consumption history
To access your consumption history via the GUI you can visit the "profile" section of any portal that has not filtered out the services you did consume.
Under the section "Downloads" you will find a full overview of all services that have been contracted for download.
Under the section "Compute Jobs" you will find a summary for all compute processes, the respective audit trails and the options to access the results of previous computations.
Thanks for your contribution to Gaia-X, the interest in our Gaia-X Web3 ecosystem and the GEN-X network.
If you need help with anything, just let us know, we are happy to assist you. Just contact thomas@delta-dao.com and kai@delta-dao.com if you have questions or need help.
If you want to get started with some additional quick links to the ecosystem and additional resources, please follow https://docs.pontus-x.eu/docs/quick_links.